Friday, August 13, 2010

Transfer your Iphone/Ipod touch Itunes purchases to your computer.

I was in a bind the other day. I was on the road, and heard a great song. I had no WiFi, so I was forced to purchase the song in the ITunes (yuk!!) store, using my IPhone.

When I got home, I wanted to transfer my purchased music to my computer. Of course Apple has a problem with this. Purchased songs don't even show up in Rhythmbox. Here is a simple way to transfer your purchased music.

Browse to Purchases on your IPhone/IPod Touch.


This is where my song is. It is named "260927173-30001436599842.m4a". All I have to do is copy this file to my machine and rename it. You can also grab the album artwork as well.

Sunday, May 2, 2010

How to integrate a Gmail notifier to Gnome's message notifier.


I have used Evolution for a long time. Before it I used Thunderbird. Since I am on many different machines throughout my day, it does not make sense trying to sync all of my E-mail's over all of my machines. The Gmail webUI works better than any desktop client I have found. I have converted completely from a desktop email client, to a web based email client, and I don't plan on going back :)

The only problem I have been having is integrating a Gmail notifier system into Gnome's message notifier, that by default, uses gwibber, empathy, and evolution.

Here is the work around:

First add the PPA;

sudo add-apt-repository ppa:gm-notify-maintainers/ppa


Then, update, and install;

sudo apt-get update && sudo apt-get install gm-notify


To setup your account information go to System > Preferences > GMail Notifier Configuration


From here you can also setup a notification sound, along with a few other settings.

Enjoy!!

Tuesday, April 27, 2010

Windows 7 "snap" feature, eat your heart out...

This is a simple setting in compiz config settings manager. If you don't have the advanced compiz settings manager installed, open a terminal and type:

sudo apt-get install compizconfig-settings-manager


Once installed, go to System>Preferences>Compizconfig Settings Manager.

Under Window Management, click on Grid. This is where you set everything up. Here is a screen shot of how I set mine up:


As you can see I use the WindowsKey(Super)+the arrow keys. I also use the arrow keys on my numpad. You can set this up however you want though...

Lastly, make sure you check the box to "enable grid", and you should be good to go!

Here is a video of my set up in action:

VNC. How to get your screen to refresh with compiz enabled.

There have been many bug reports on launchpad that describe this problem. I have been searching for a fix for a few months now, and short of disabling compiz, I could not find anything. Today I stumbled over the answer. It is quite simple actually, just a few steps:

1. Hit Alt+F2 and type gconf-editor

2. desktop > gnome > remote_access

3. Put a check in the disable_xdamage box.

You should now be able to VNC into this machine with a screen refresh.

Tuesday, March 2, 2010

How to (finally) sync your IPhone, or IPod touch with Ubuntu 9.10!!!

I have been trying to sync my IPhone with Ubuntu, since I've had the stupid thing :). There is finally a way to do it!!

I am testing this with Ubuntu 9.10, supposedly it will be built into 10.04. The IPhone firmware is 3.1.2, it is jailbroken, but this method works on a non-jailbroken IPhone/IPod as well.

1. Add the repository
sudo add-apt-repository ppa:pmcenery/ppa

2. Update apt
sudo apt-get update

3. Install the necessary packages
sudo apt-get install gvfs gvfs-backends gvfs-bin gvfs-fuse libgvfscommon0 ifuse libgpod-dev libgpod-common libimobiledevice-utils libimobiledevice0 python-imobiledevice libplist++1 libplist-utils python-plist libusb-1.0-0 libusb-1.0-0-dev libusbmuxd1 usbmuxd

4. One of the Packages you just installed was IFuse. It allows you to mount an IPhone/IPod touch with a USB cable. We are going to edit the IFuse configuration file now.
gksudo gedit /etc/fuse.conf

5. There is a line at the very bottom that looks like this:
#user_allow_other

6. Remove the #, so it looks like this:
user_allow_other

7. Save the file, and exit Gedit


8. Add yourself to the "Fuse" group by going to “System” -> “Administration” -> “Users and Groups”, Unlock it so you can make changes, select your username, then click on "Manage Groups"

Find the "fuse" group, and double click it. Tick the checkbox next to your name, then click on OK, and close "Users and Groups". You are now a part of the "fuse" group


9. Plug in your device. (do not make a mount point with your device unplugged. If you already did, delete the directory) First you need to make a mount point for your IPhone/IPod touch. You can name this either, I will use "IPhone"
sudo mkdir /media/IPhone

10. Give yourself the correct permissions
sudo chmod 777 /media/IPhone

Mount your device
ifuse /media/IPhone/

if you get an error saying
"No device found, is it connected?
If it is make sure that your user has permissions to access the raw usb device.
If you're still having issues try unplugging the device and reconnecting it.
"
unplug your device, plug it back in, and try again.


11. You need to get the UUID with this command.
lsusb -v | grep -i iSerial

I highlighted my UUID in the screenshot below. Yours should be 40 characters long, hightlight it, right click, and select copy

type this command, replace "YOUR UUID" with your UUID that you just copied in the last step. Run the command.
ipod-read-sysinfo-extended YOUR UUID /media/IPhone

12. Unmount the IPhone.
fusermount -u /media/IPhone

13. Reboot, Plug in your IPhone/IPod touch, and it will now be seen as a camera and a media device!!

Add songs with Rhythmbox. I'm sure it works with Banshee, and others, but I have not tested them. Enjoy!!


I learned how to do this here: http://www.taranfx.com/sync-iphone-linux

Saturday, January 2, 2010

Upgrade Iphone firmware to 3.1.2, and jailbreak using Sun Virtualbox on Ubuntu 9.10 Karmic Koala (the easy way).

This is the setup:
A. Ubuntu 9.10 (probably any version)
B. VirtualBox Version 3.0.12 (any newer version)
C. Current IPhone firmware version 2.2.1 (or any version of firmware)
D. Back up your apps, music, and other stuff!!
E. Download the pre-jailbroken .ipsw from sinful IPhone to your desktop. They have several different versions (unlocked, locked) for different devices. Download the version that you need. This is the easiest way to jailbreak a phone.

I have jailbroken/upgaded about 20 phones this way and it works every time. I've used other methods as well, and I find this to be the easiest. I have not tried this with the Ipod touch, but on the sinful IPhone website, they have jailbroken IPSW's for Ipods as well.

1. First off you need Suns Virtualbox, the non-free (free as in freedom) version. You can get that here. You need the non-free version to use USB. Make sure when setting up VirtualBox, you allow enough room in you virtual hard drive to store all of the data you want to back-up on your IPhone.

2. After that is done, you need to install a Windows operating system. I use Windows XP in these examples. If you are having trouble installing Windows as a guest in Virtualbox, here is a step by step tutorial.

3. Download and install Itunes

4. Plug your IPhone in and let Itunes recognize it. You may want to disable syncing with Itunes.

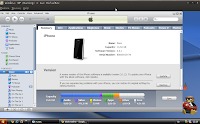
5. You will get a pop up asking if you want to update to the newest software. Click "no".

6. Back up your IPhone by right clicking on the phone under devices, and select back up. If you have more data on your Iphone than you have on your VirtualBox "hard drive", the backing up process will hang.

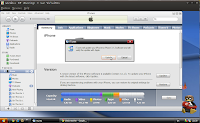
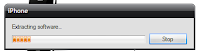
7. Hold the "shift" key and click on "restore", then choose the "pre-jailbroken ISPW that you downloaded from sinful IPhone at the beginning of this tutorial. This process takes about 15 minutes.


If you get an error saying that that restore process failed, don't worry. Install this program to fix 16xx, and 21 errors: Ireb, it's on the right... With Ireb you have to right click on the usb filter in VirtualBox and reselect your iphone when you are not getting the "white screen".


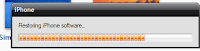
You now have firmware version 3.1.2 installed. Oh yeah, and it's jailbroken...:)

Saturday, December 19, 2009

how to enable compiz with dual head monitors in Ubuntu 9.10 Karmic

So you want to enable Compiz-fusion with your dual head monitors? Here's the deal, compiz runs at a maximum resolution of 2048 x 2048. This is where most people run into trouble. You can't run both monitors side by side because it exceeds the maximum resolution.

Here is what to do:
1. first off go to System>Preferences>Display
2. un-check "mirror screens"
3. stack your 2 monitors on top of each other. Just click and hold on one, and move it above or below the other.
4. then go to preferences>appearance>click on the visual effects tab, and enable extra effects.
5. If you have Compiz installed, it will work right away.